
These Gluten Free Hot Cross Buns are soft and wholesome and taste like the real deal! Just because you’re gluten free doesn’t mean you have to miss out on the Easter fun! This recipe is also dairy free and refined sugar free.
In my opinion, you can’t do Easter without Hot Cross Buns and my healthy, gluten free version fits the bill. Enjoy alongside my Oat Milk Hot Chocolate for the perfect Easter treat!
Or make a delicious Easter Platter using these gf hot cross buns, my Dark Chocolate Almond Butter Cups, Healthy Rocky Road and a selection of berries, YUM.
Ingredients
This recipe uses the perfect blend of gluten free flours, for a soft yet sturdy crumb.

- Tapioca Flour
- Sorghum Flour
- Rice Flour
- Sea Salt
- Cinnamon
- Cardamon
- Nutmeg
- Clove
- Psyllium
- Sultanas
- Yeast
- Xantham Gum
- Rapadura Sugar
- Extra Virgin Olive Oil
- Orange Zest
- Soy Milk (or other plant based milk)
- Egg
- Water
For the egg wash you will need:
- Egg
- Soy Milk
For the crosses you will need:
- Tapioca Flour
- Rice Flour
- Coconut Oil
- Xantham Gum
- Water
See recipe card for quantities.
Making the Hot Cross Buns Dough
These gf hot cross buns take around 30 minutes to prepare, one hour to prove the dough and 25-30 minutes to bake.
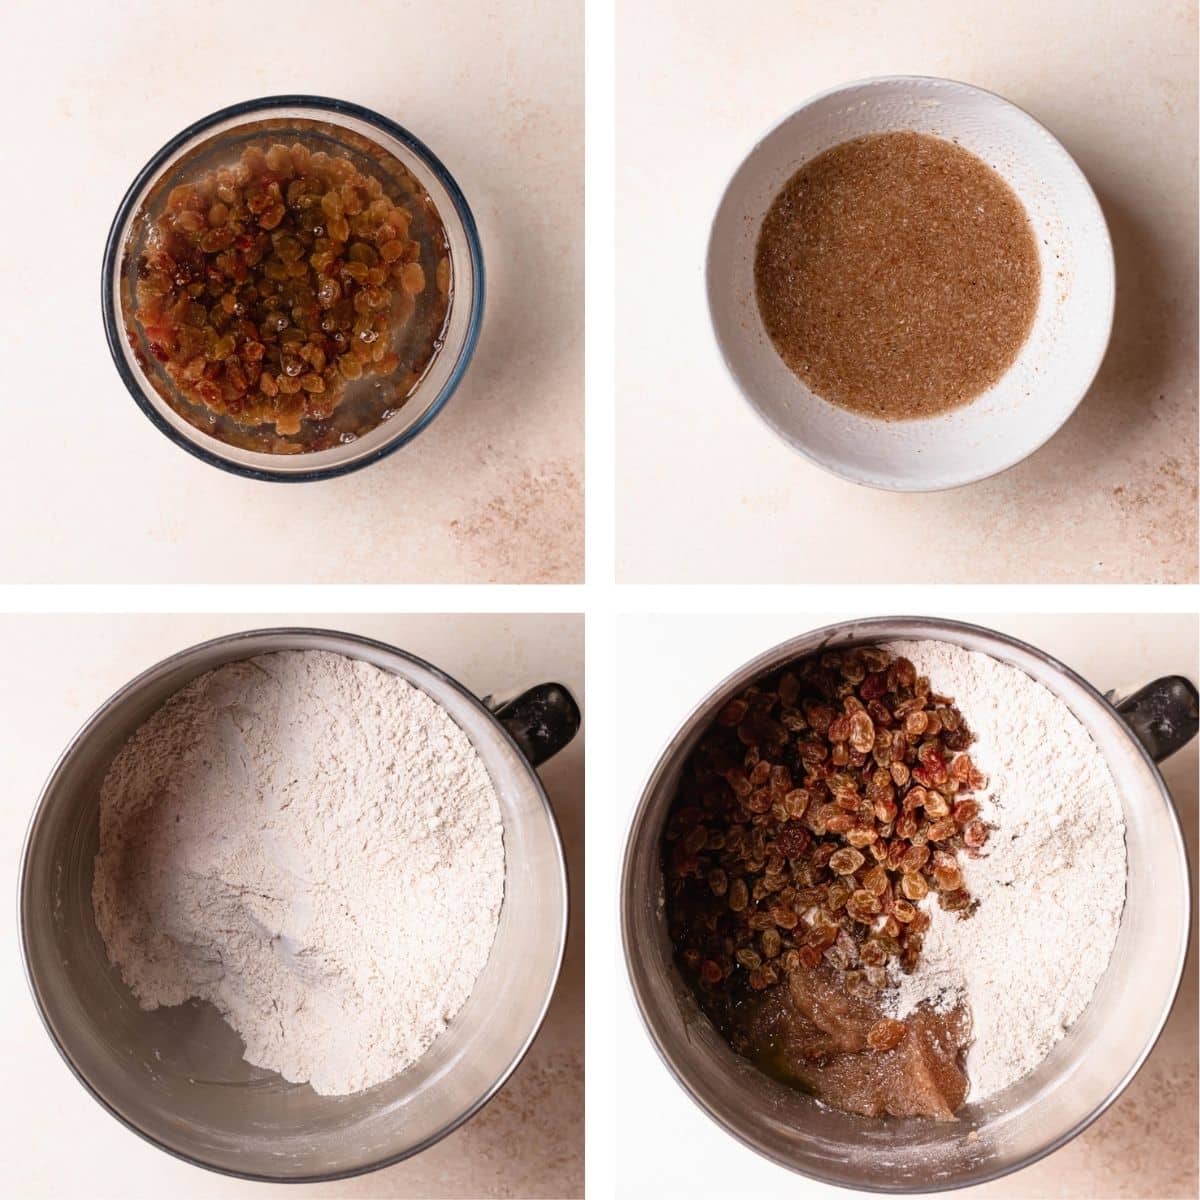
STEP 1: Rehydrate sultanas. Place the sultanas into a heatproof bowl and top with boiling water. Set these aside while you move on with the next steps.
STEP 2: Make psyllium gel. Add the psyllium husks to a bowl and top with water, stirring to combine. The psyllium will absorb the water, creating a gel.
STEP 3: Mix dry ingredients. Add the sorghum flour, tapioca starch, rice flour, spices, yeast, salt and rapadura sugar to a stand mixer bowl or large mixing bowl. If using a stand mixer, mix on low with the dough hook to combine. Turn the stand mixer to off and lift the arm, using a spatula to incorporate all ingredients at the bottom of the bowl. If using a large mixing bowl, whisk ingredients to combine.
STEP 4: Warm milk. Add the milk to a saucepan and heat until luke warm.
STEP 5: Add wet ingredients to bowl. Strain the sultanas and add to the stand mixer bowl or large mixing bowl. Add the egg, olive oil, orange zest and psyllium gel. Using the stand mixer with a dough hook, turn the mixer onto low, gradually pouring milk in while mixing. Once well combined use a spatula to mix any dry ingredients at the bottom of the bowl into the dough. If using a mixing bowl, pour milk into the bowl and use a wooden spoon to combine.
How to Form Hot Cross Buns
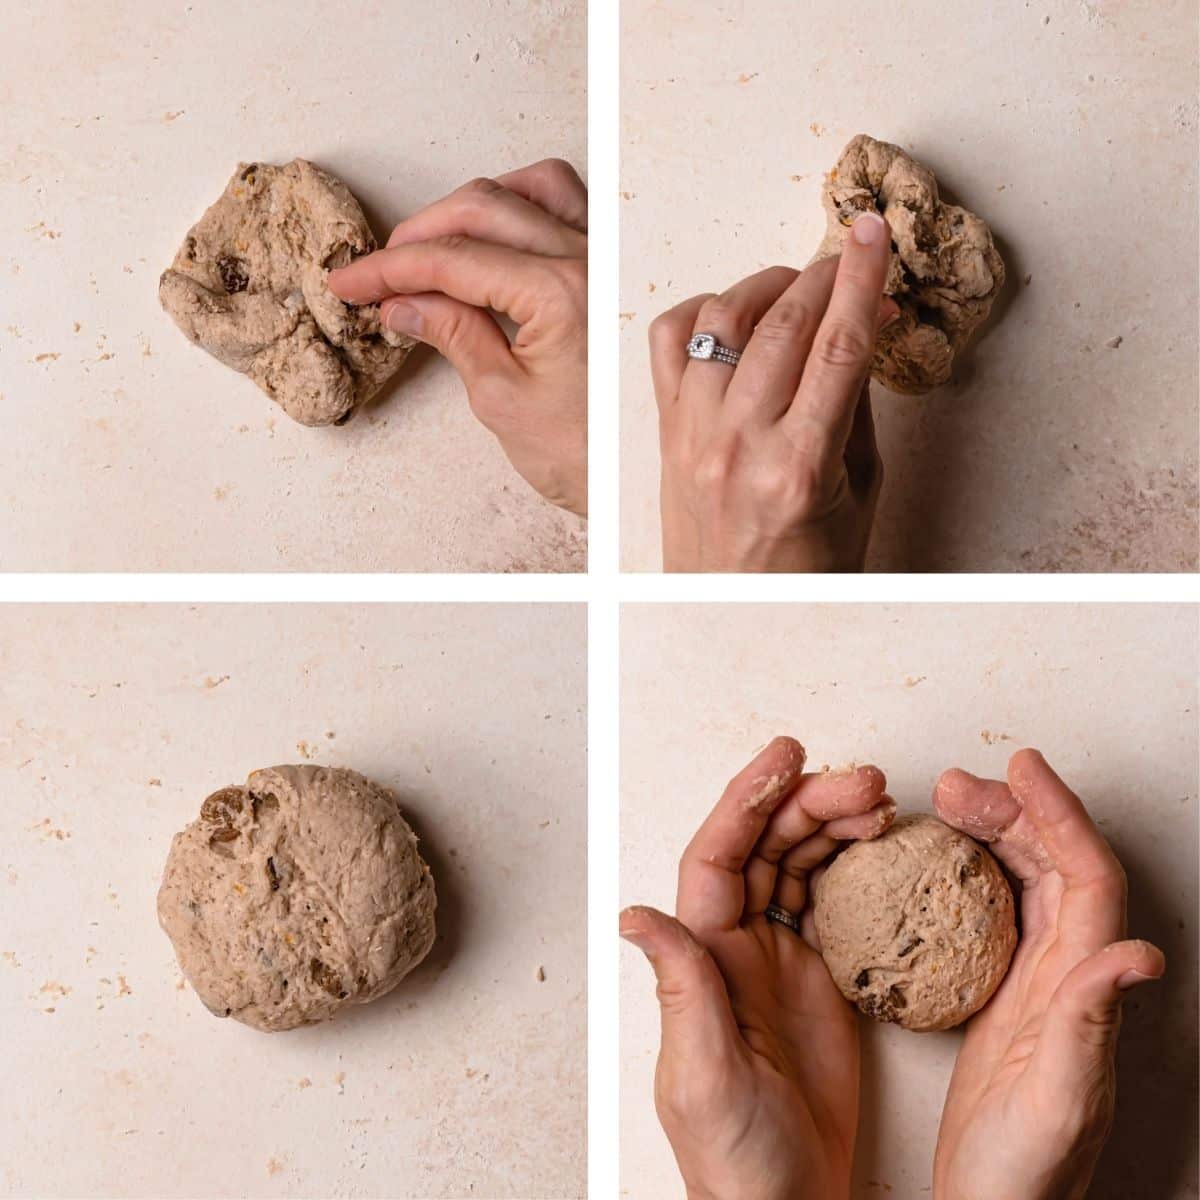
STEP 6: Divide mixture. Turn the dough out onto a clean, floured surface. Use hands to form into a long log. Cut the log evenly into 14 pieces. Alternatively, you can measure the dough, divide by 14 and measure each individual piece to create evenly sized buns.
STEP 7: Prepare gluten free hot cross buns. Take one piece of dough and use hands to flatten the piece of dough into a disc, about 2 centimetres thick. Pick up one edge of the dough and bring it into the centre. Take a second, then a third and finally a fourth edge of the dough, bringing each edge into the centre and squeezing together. Flip the bun over and use hands to roll into an even ball.
Would you like to save this?
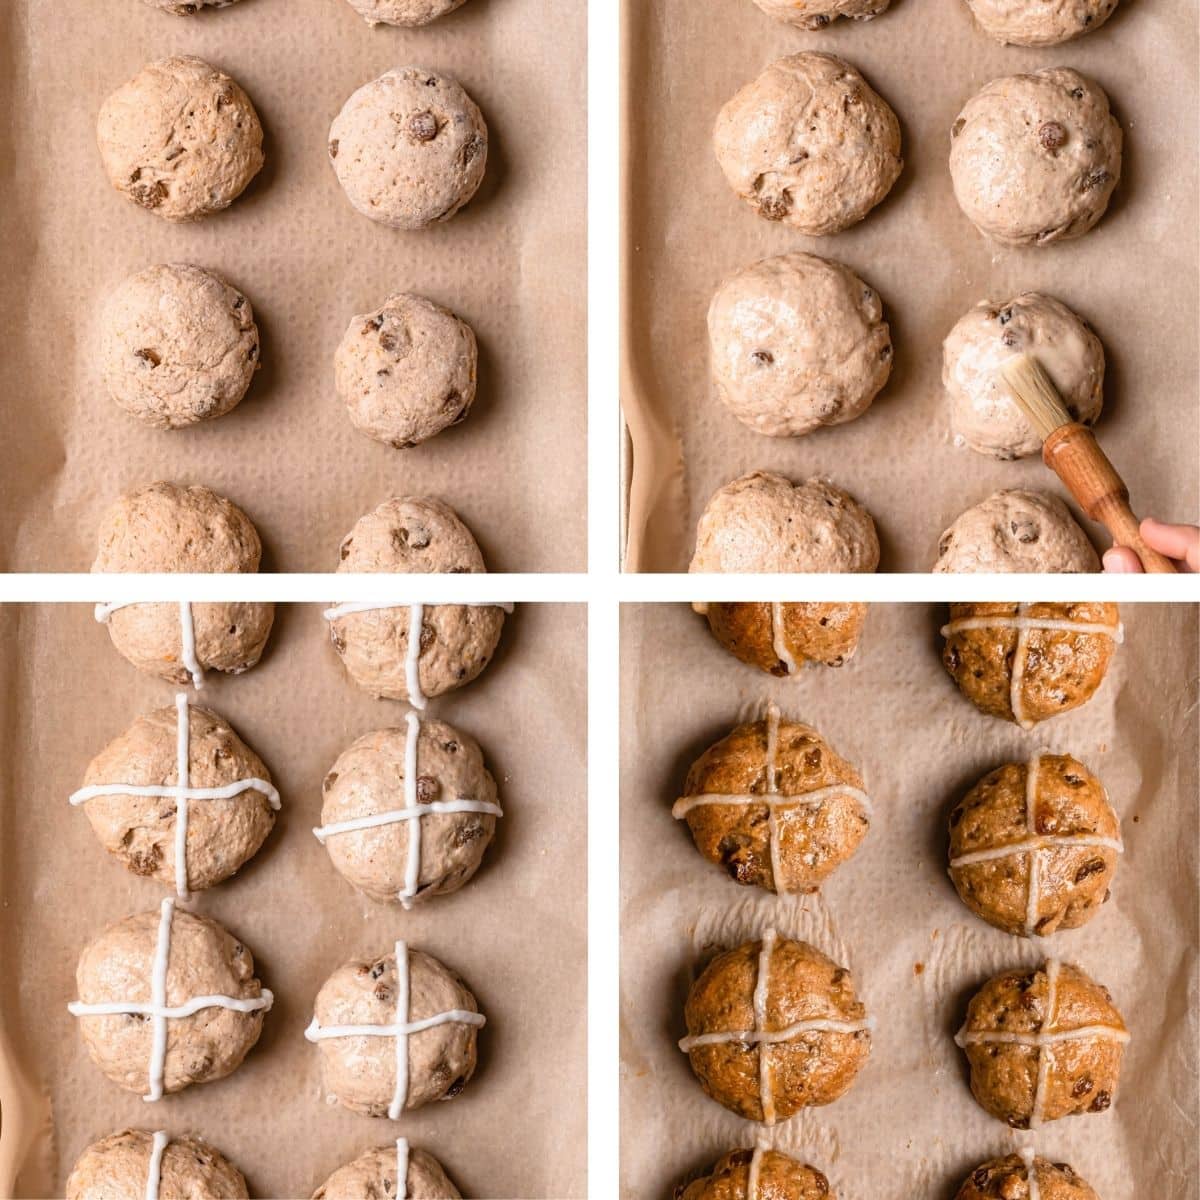
STEP 8: Prove. Repeat step 7 until all of the buns are made. Place onto 2 baking paper lined trays, each bun at least 2 centimetres apart. Cover with glad wrap and set aside to prove for one hour. The buns should almost double in size.

Final Steps
STEP 9: Apply egg wash. Once proved, brush the tops of each bun with egg wash.
STEP 10: Apply crosses. Create cross mixture by adding tapioca, rice flour, water, xantham gum and coconut oil to a bowl and whisking. Transfer mixture into a piping bag and snip the end of the piping bag. Pipe mixture across the tops of each bun to form a cross.
STEP 11: Bake. Place a baking tray filled with boiling water on the bottom shelf of the oven. Place the hot cross buns into the oven and bake for 25-30 minutes, removing the tray of water after 10 minutes. Once baked transfer buns to a wire cooling rack straight away.
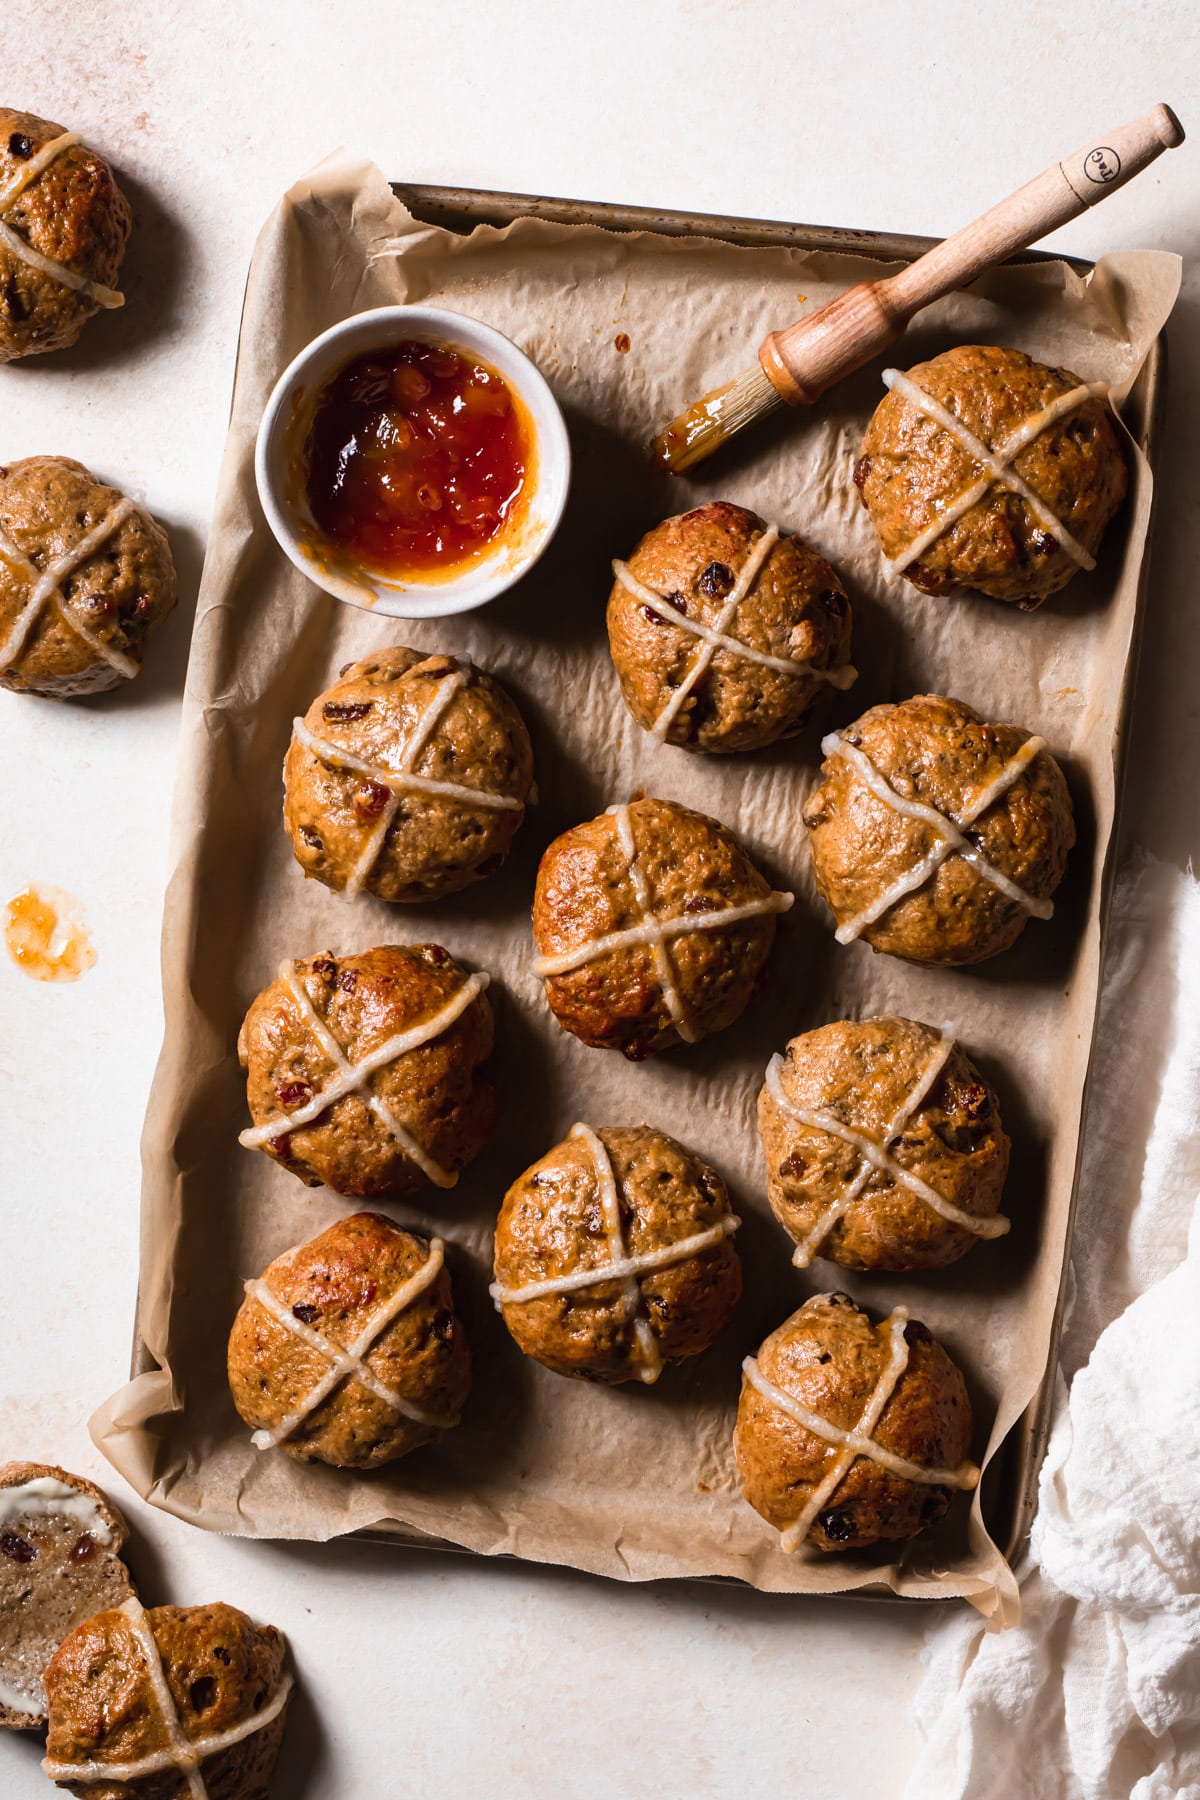
STEP 12: Glaze. Create an apricot glaze by warming water and apricot jam in a saucepan. Use a basting brush to brush the tops of each bun.
Hint: These buns are the best on the day of baking. I recommend warming each bun up in the microwave for 40 seconds before eating on following days.
Substitutions for GF Hot Cross Buns
Here are some substitutions you can make to make these buns to suit your personal taste.
- Sultanas – instead of sultanas or raisins you can use dried apricots, cranberries or leave dried fruit out for a lower fructose bun.
- Rapadura Sugar – use coconut sugar or brown sugar in place of rapadura sugar.
- Choc Chips – add dark chocolate chips for a delicious choc chip hot cross bun.
Equipment
No fancy equipment is required for this recipe. I have used a stand mixer with a dough hook but you can also make these buns just as easily in a bowl with a wooden spoon.
Storage
Store the baked hot cross buns in an airtight container at room temperature for up to 3 days. Alternatively you can freeze the hot cross buns and defrost them as needed. If storing in the freezer, I recommend warming in the oven or microwave to return them to their just baked state.
FAQ
Yes! Sorghum flour is a nutritious gluten free grain and works well mixed with other gluten free grains in baking.
Easter Recipes I am Loving!
I love the range of delicious food you can eat over Easter! I’m currently loving this Beet Cured Salmon Gravlax, Sugar Free Glazed Ham or this Eggless Carrot Cake.
And of course you can’t go past these delicious goodies from Our Nourishing Table:
Gluten Free Hot Cross Buns (Dairy Free)

Equipment
- 1 Stand Mixer with Dough Hook or mixing bowl, wooden spoon and whisk
- 2 Baking trays
Ingredients
Buns
- 7 grams instant yeast
- 1 ½ cups organic sultanas, (244 grams ) or raisins
- 3 tbsp psyllium husk, (15 grams)
- 155 milliletres water, (150 grams)
- ½ cup rapadura sugar, (90 grams)
- 1 ¼ cups sorghum flour, (177 grams)
- 1 ½ cups rice flour, (261 grams)
- 1 ¼ cups tapioca flour, (142 grams)
- 1 tbsp xantham gum, (8 grams)
- 2 tsp cinnamon, ground
- ½ tsp nutmeg, ground
- ¼ tsp cardamom, ground
- ¼ tsp cloves, ground
- ½ teaspoon sea salt flakes
- 1 ½ cups soy milk, warmed
- 1 orange, zest only
- 2 ½ tbsp extra virgin olive oil
- 1 egg, room temperature
- Extra flour, for rolling
Egg Wash
- 1 egg
- 2 tbsp soy milk
Crosses
- 2 tbsp rice flour, (20 grams)
- 2 tbsp tapioca starch, (13 grams)
- ¼ tsp xantham gum
- 5 tbsp water
- 1 tbsp coconut oil, (11 grams) extra virgin, cold pressed, liquefied
Glaze
- 4 tbsp apricot jam, low sugar
- 2 tbsp water
Instructions
Buns
- Line a baking tray with baking paper and set aside.
- Place sultanas or raisins into a medium sized heat proof bowl and top with boiling hot water. Set aside to rehydrate while moving onto the next steps (approximately 10 minutes). After rehydrated, strain off the liquid by pouring the sultanas and water into a sieve over the sink. Return the sultanas to a clean bowl and set aside.1 ½ cups organic sultanas (244 grams ) or raisins
- Meanwhile, in a small bowl add the psyllium husk with the water. Stir to combine and then set aside until the psyllium husk absorbs all the water and forms a gel.3 tbsp psyllium husk (15 grams), 155 milliletres water (150 grams)
- To a large mixing bowl or stand mixer add the rapadura sugar, sorghum flour, rice flour, tapioca flour, xantham gum, yeast, cinnamon, nutmeg, clove, cardamom, and sea salt. If mixing in a bowl, whisk to combine. If using a stand mixer, use the dough hook and mix on low to combine. After, use a spatula to ensure all of the flours and spices are fulling incorporated.7 grams instant yeast, ½ cup rapadura sugar (90 grams), 1 ¼ cups sorghum flour (177 grams), 1 ½ cups rice flour (261 grams), 1 ¼ cups tapioca flour (142 grams), 1 tbsp xantham gum (8 grams), 2 tsp cinnamon ground, ½ tsp nutmeg ground, ¼ tsp cardamom ground, ¼ tsp cloves ground, ½ teaspoon sea salt flakes
- Add the psyillium gel, sultanas, egg, warm milk, zest and olive oil. Mix well to combine and then using hands, squeeze the mixture together until a smooth dough forms. If using a stand mixer, mix on low until a smooth dough forms, being sure to scrape down the sides and bottom of bowl so that all the dry mixture is incorporated.1 ½ cups soy milk warmed, 1 orange zest only, 1 egg room temperature, 2 ½ tbsp extra virgin olive oil
- Generously flour a clean surface and turn the dough out onto the surface. Using hands, form the dough into a long log and cut into 14 pieces. Pick up one piece of dough and use hands to form a circular shape, about 2 cm thick. Pick one edge of the dough and bring it into the centre of the dough. Repeat with the opposite side and then repeat on the perpendicular (so that you are bring in four edges of the dough to the centre). Turn the ball over and roll gently around in a circle to seal the bottom of the dough and to form a bun. Place onto the baking Tray.Extra flour for rolling
- Repeat the previous step until each bun is formed. Be sure to place each bun around 2 centimetres apart. Place the tray in a warm place, covered with glad wrap, to proof until the buns have doubled in size.
- While the buns are rising, preheat the oven to 200 degrees Celsius (non-fan forced) or 180 degrees Celsius (fan-forced).
Egg Wash
- Make the egg wash by whisking together the egg and milk.1 egg, 2 tbsp soy milk
- Once the buns have almost doubled in size, use a pastry brush to lightly brush the egg wash over the surface of the buns.
Crosses
- Whisk together the rice flour, tapioca starch, xantham gum, melted coconut oil and water together to create a smooth paste.2 tbsp rice flour (20 grams), 2 tbsp tapioca starch (13 grams), ¼ tsp xantham gum, 5 tbsp water, 1 tbsp coconut oil (11 grams) extra virgin, cold pressed, liquefied
- Transfer paste to a piping bag and snip the end.
- Pipe mixture across the top of each bun to create a cross.
- Place a baking dish onto the bottom shelf of the oven and fill with boiling water. Place the two baking trays with buns into the middle rack of the oven. After ten minutes remove the baking dish of boiling water and continue baking buns for a further 20 minutes. Buns are baked when golden brown and spring back when pushed down.
- Once baked, remove buns from oven and transfer immediately to a wire cooling rack.
Apricot Glaze
- Add the apricot jam and water to a small saucepan and bring to a medium heat, whisking to combine.4 tbsp apricot jam low sugar, 2 tbsp water
- Use a pastry brush to brush glaze onto the top of each bun.
- Serve buns slightly warm or room temperature.
Notes
Storage
Store in an airtight container at room temperature for up to 3 days. Buns can be frozen in airtight container and defrosted as needed.Serving
These gluten free hot cross buns are best on the day of baking. If serving following the day of baking, warm in the microwave for 40 seconds to return to their just baked softness.Nutrition
Enjoy!


Like this recipe? Leave a comment!