Our Nourishing Table main logo
  • Recipes
  • Cookbook
  • Shop
  • Recipes
  • Cookbook
  • Shop

  • About Sarah
  • Work With Me

GET my debut cookbook!

‘Our Nourishing Week’

GET my debut cookbook!
‘Our Nourishing Week’

order now
Home > Recipes > Meal type > Slices & Bars
Homemade gluten free muesli bars on a pink background.

No Bake Gluten Free Muesli Bars – Nut, Egg & Dairy Free

  • DF
  • EF
  • GF
  • NF
  • V

5 from 1 vote
Prep Time 15 minutes mins
Cook Time 1 hour hr
Total Time 1 hour hr 15 minutes mins
These delicious, homemade no bake gluten free muesli bars are filled with healthy, nourishing ingredients. They are nut free, egg free, dairy free and gluten free, making them great for the school or kindy lunchbox.
Jump to Recipe
23 October 2023
August 25, 2025

by

Sarah Bell

Disclosure: This page contains affiliate links, which I earn a small a commission from when you purchase through a link, at no extra cost to you. Thank you for your support!

Share the Love!

  • Facebook
  • X

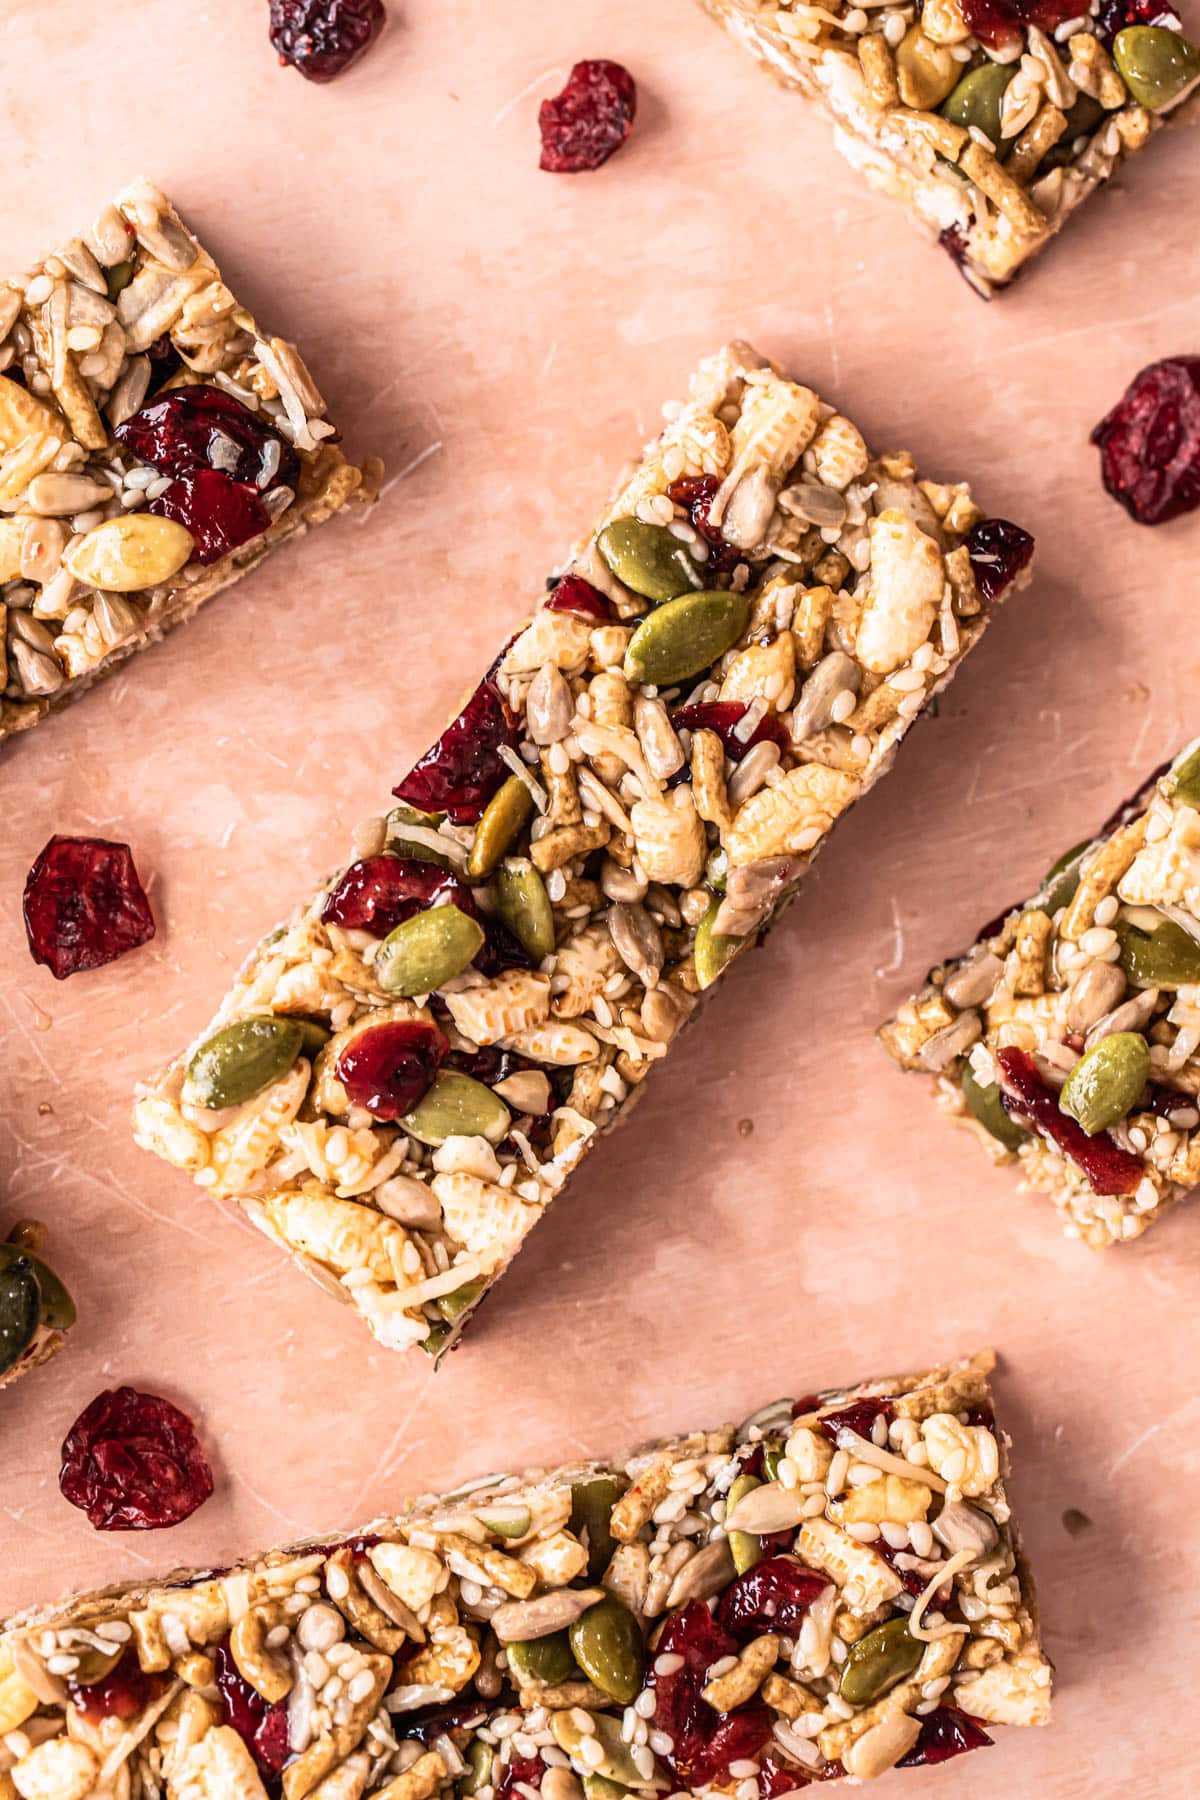
These delicious Gluten Free Muesli Bars are not only gluten free but egg and nut free as well, making them perfect for the school or kindy lunchbox. Or for you to enjoy with a cuppa. Filled with nutritious ingredients like sunflower seeds, pumpkin seeds and rice bran, these muesli bars will hit the sweet spot while keeping you fuller for longer. 

Homemade gluten free muesli bars on a pink background.
Contents:
  1. Reasons To Love These Gluten Free Muesli Bars
  2. Ingredients Notes & Substitutions
  3. How to Make Gluten Free Muesli Bars
  4. Storage 
  5. Food Safety 
  6. ​Can I Use Certified Gluten-Free Oats?
  7. Variations
  8. No Bake Gluten Free Muesli Bars

Naturally sweetened with honey, homemade gluten free muesli bars are much healthier than the store-bought granola bars. The honey and coconut oil gives these homemade granola bars a delicious chewy texture. They provide you with healthy fats, fiber and a whole range of vitamins and minerals. If you’re not avoiding gluten then you could also try my Healthy Muesli Slice (not gluten free) or try my Energy Bars for a gluten free and vegan snack. 

Reasons To Love These Gluten Free Muesli Bars

It can be hard to find gluten free snacks that are not only delicious but are good for you too! Well these nut-free granola bars tick all of the boxes and more! 

  • Perfect snack – providing complex carbohydrates, healthy fats and lots of fiber, these muesli bars are so good for you! 
  • No oats – A lot of “gluten free” recipes still contain oats, which unfortunately aren’t suitable for Coeliac’s. Well I’ve got your back because this recipe is completely oat free. 
  • Healthy – these gluten-free granola bars are a great way to get some extra seeds into your diet, which have so many health benefits. 
  • Food allergies friendly – this recipe is completely gluten free, nut free, egg free and dairy free, so perfect for anyone with these allergies.
  • No bake recipe –  once mixed together, these gluten free muesli bars set in the fridge, no baking needed! It’s such an easy recipe to make! 
Homemade gluten free muesli bars on a pink background.

Ingredients Notes & Substitutions

Made up of healthy ingredients, all of which can mostly be found in the pantry, these yummy gluten free muesli bars are healthy and nutritious. See the ingredients needed for this recipe below as well as any notes and possible substitutions. 

Wet Ingredients

  • honey – I’ve used honey to sweeten these muesli bars. You can use brown rice malt syrup as well, like I have done withe my energy bars. Maple syrup won’t work well in this recipe.
  • coconut oil – I’ve used cold pressed extra virgin coconut oil as it is the least processed. Using coconut oil does mean that these muesli bars need to be kept in the fridge and are best eaten straight out of the fridge. 

Dry Ingredients

  • puffed rice – puffed brown rice can usually be found at your local health food store. I would recommend against using rice bubbles as they aren’t as healthy as using puffed rice (rice bubbles have more ingredients then just rice). 
  • rice bran straws – these add fiber and crunch to the bars and can also be found at your local health food store. 
  • shredded coconut – shredded coconut works much better then desiccated coconut or coconut flakes.
  • sunflower seeds – if you can’t get sunflower seeds you can use more pepitas. If you’re not worried about nuts then you can also use chopped almonds, pecans or walnuts. 
  • sesame seeds – feel free to swap the sesame seeds for hemp seeds or flax seeds if you prefer. 
  • pepitas – also known as pumpkin seeds, you can swap for more sunflower seeds.
  • dried cranberries – you can use any other dried fruit that you prefer like sultanas, raisins, chopped dried apricots or chopped dried dates. 
Ingredients for gluten free muesli bars laid out in individual bowls.

How to Make Gluten Free Muesli Bars

Making these no bake, healthy granola bars is super simple. Follow my step-by-step instructions to see how it is done. 

Would you like to save this?

We’ll email this post to you, so you can come back to it later!

First, line a slice tin with parchment paper and set aside. 

Next add all of the dry ingredients (the puffed rice, rice bran straws, shredded coconut, sunflower seeds, sesame seeds and pepitas) into a large mixing bowl. Mix to combine. 

Parchment paper lined slice tin.
Dry ingredients for gluten free muesli bars in a large mixing bowl.

Add the honey and coconut oil into a medium saucepan on a medium heat. Whisk to combine. Once the mixture starts bubbling whisk again. When the honey mixture turns a golden brown colour, remove from the heat. 

Pour the hot honey mixture into the granola mixture and stir with a wooden spoon to combine. Once well combined, pour mixture out into the pan. Spread out evenly and press down firmly with the back of a spatula. 

Honey mixture in a saucepan bubbling.
Honey and coconut oil mixed together in a saucepan.
Honey mixture poured into dry ingredients in a large mixing bowl.
Gluten free muesli bars mixture poured into a parchment paper lined slice tin.
Gluten free muesli bar mixture spread out in slice tin.
Gluten free muesli bars mixture being pushed down with a metal spatula.

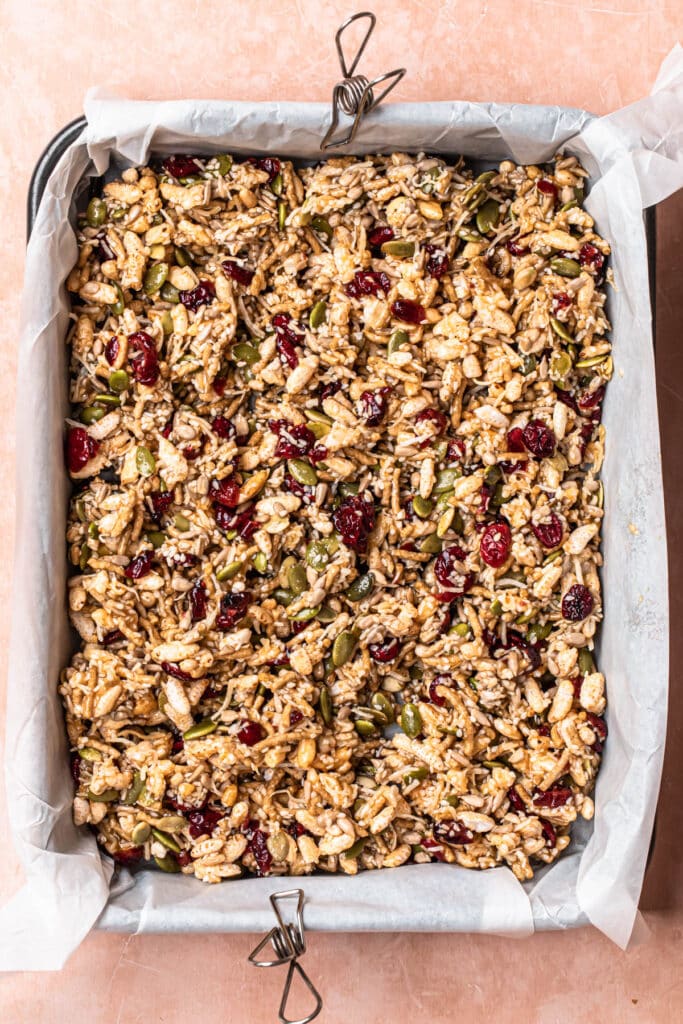
Place the pan into the fridge to set for around one hour or until very firm. Remove from the fridge and slice with a sharp knife into muesli bars. 

Top down close up photo of gluten free muesli bars.

Storage 

Store these homemade muesli bars in an airtight container in the fridge for up to 4 weeks. If you’re packing these into school lunches, make sure that the lunchbox has an ice brick as they will soften at room temperature and fall apart. 

Food Safety 

If you are preparing these for someone with Coeliac’s disease, or if you are a Coeliac, then it is really important to buy all certified gluten-free ingredients, to prevent any kind of contamination. If the equipment used to prepare these muesli bars have been used to prepare gluten containing foods, then you also need to make sure that the equipment is all very thoroughly cleaned. Even small amounts of gluten can cause gut damage in someone with this condition. 

​Can I Use Certified Gluten-Free Oats?

If you’re thinking of swapping the puffed rice for oats then it’s important to note that oats are not suitable for someone with Coeliac disease. Even if they are “certified gluten-free oats”, they still contain a protein that mimics gluten. For someone with Coeliac’s disease, this can still trigger an auto-immune response and for this reason, most specialists advice against consuming oats of any kind. For more information, read this article. Quinoa flakes or brown rice flakes are the best gluten free alternatives to oats. 

Variations

  • choc chip – add in 1/2 cup of dark chocolate chips or white chocolate chips to the mixture. Or melt dark chocolate and drizzle over the top of the muesli bars and refrigerate to set. 

No Bake Gluten Free Muesli Bars

5 from 1 vote
By: Sarah Bell
These delicious, homemade no bake gluten free muesli bars are filled with healthy, nourishing ingredients. They are nut free, egg free, dairy free and gluten free, making them great for the school or kindy lunchbox.
Homemade gluten free muesli bars on a pink background.
print pin Leave Review
Prep Time 15 minutes mins
Cook Time 1 hour hr
Total Time 1 hour hr 15 minutes mins
Servings: 16

Equipment

  • Medium saucepan
  • Measuring Cups and Spoons
  • Large mixing bowl
  • Wooden Spoon
  • Metal spatula
  • Slice tin
  • Parchment paper
  • Sharp knife

Ingredients

  • ½ cup honey
  • 5 tablespoons coconut oil, extra virgin
  • 1 cup puffed rice
  • ½ cup rice bran straws
  • ½ cup shredded coconut
  • ½ cup dried cranberries
  • ½ cup sunflower seeds
  • ¼ cup sesame seeds
  • ¼ cup pepitas
Prevent your screen from going dark

Instructions 

  1. Line a slice tin with baking paper and set aside.
  2. Add the puffed rice, rice bran straws, shredded coconut, dried cranberries, sunflower seeds, sesame seeds and pepitas to a large mixing bowl. Stir to combine.
  3. To a medium sized saucepan add the honey and coconut oil. Whisk to combine and bring to a medium heat. Once the honey starts bubbling, whisk again.
  4. When the honey mixture turns a slightly dark golden brown colour, remove from the heat.
  5. Pour the honey mixture into the dry mixture and stir well to combine. Pour the mixture out into the lined slice pan and press down firmly with an egg flip.
  6. Place the slice tin into the refrigerator to set for 1 hour. Once firm, remove from the refrigerator and slice into 16 slices.

Notes

Store the slice in the refrigerator in an airtight container. This slice is best eaten within 30 minutes of taking out of the refrigerator.
Nutrition facts are an estimate only.

Nutrition

Calories: 158kcalCarbohydrates: 17gProtein: 2gFat: 11gSaturated Fat: 6gPolyunsaturated Fat: 2gMonounsaturated Fat: 2gTrans Fat: 0.001gSodium: 3mgPotassium: 125mgFiber: 2gSugar: 12gVitamin A: 2IUVitamin C: 0.2mgCalcium: 31mgIron: 2mg
Course: lunchbox,Snacks,Sweets
Cuisine: American,Gluten Free
Diet: Gluten Free,Low Lactose
Keyword: dried cranberries,gluten free,muesli bars
Tried this recipe?Post your recreation to Instagram and mention @ournourishingtable or tag #ournourishingtable! Don’t forget to let us know how you went by rating this recipe and commenting below.

You might also like…

No bake energy bars stacked on top of each other.
Healthy Treats
  • DF
  • EF
  • GF
  • V

No Bake Energy Bars – Plant Based

muesli slice cut into bars, stacked onto a cooling wrack.
Slices & Bars
  • EF
  • NF

Healthy Muesli Slice Recipe – Nut Free

Nut free chocolate bliss balls on a plate.
Healthy Treats
  • DF
  • EF
  • GF
  • NF
  • V

Nut Free Chocolate Bliss Balls With Dates

Vanilla buckwheat pancake stack with maple syrup.
Breakfast
  • DF
  • EF
  • GF
  • NF
  • V

Vanilla Vegan Buckwheat Pancakes – Egg & Gluten Free

My debut cookbook–Our Nourishing Week

My debut cookbook Our Nourishing Week is a collection of 85+ easy and nutritious recipes for the whole family. It includes 6 weeks of meal plans, complete with shopping lists – simplifying your family meals for an easy, healthy week – every week.

order now

Hi, I’m Sarah!

I’m a nutritionist turned healthy recipe developer who is all about creating delicious food designed to nourish. I love using wholefood ingredients and have a strong focus on gluten free, dairy free and refined sugar free recipes.

MORE ABOUT ME >

5 from 1 vote

Like this recipe? Leave a comment!

Cancel reply

Your email address will not be published. Required fields are marked *

Recipe Rating


  1. Nadia

    February 24, 2021 AT 9.20 AM

    5 stars
    I made this last night, and it is sooooo good. Your pantry slice is famous with all of my work colleagues and family, but I think this GF version will give it some tough competition!
    Love the crunch of the buckwheat groats, how it tastes like a dessert, and only having to use one kitchen appliance!

    Reply
    1. Sarah Bell

      February 24, 2021 AT 12.00 PM

      So glad you love this recipe! It’s one of our family favs as well!

      Reply
  2. Monica

    February 14, 2024 AT 6.12 AM

    Hi! This recipe looks amazing…are they able to be frozen?

    Reply
    1. Sarah Bell

      February 20, 2024 AT 5.19 AM

      I haven’t tried freezing these but I believe that they would freeze well in an airtight container.

      Reply
  3. Nancy Belz

    October 25, 2024 AT 8.18 AM

    Good morning, I was just wondering what would you suggest as a substitute for the rice bran straws? Would you suggest using more of the other ingredients instead? Or is there a different substitute all together. Looking forward to making this soon.????

    Reply
    1. Sarah Bell

      October 30, 2024 AT 8.49 AM

      Hi Nancy! You could definitely swap for more of the puffed rice or increase the amount of all the other dry ingredients so that it adds up to the measurement given for the rice bran straws. Let me know how you go!

      Reply

My debut cookbook–Our Nourishing Week

My debut cookbook Our Nourishing Week is a collection of 85+ easy and nutritious recipes for the whole family. It includes 6 weeks of meal plans, complete with shopping lists – simplifying your family meals for an easy, healthy week – every week.

order now

Hi, I’m Sarah!

I’m a nutritionist turned healthy recipe developer who is all about creating delicious food designed to nourish. I love using wholefood ingredients and have a strong focus on gluten free, dairy free and refined sugar free recipes.

MORE ABOUT ME >

Hey there, I’m Sarah!

I’m a Bachelor qualified Nutritionist turned healthy recipe developer and the creator of Our Nourishing Table.

I love creating easy to make, nutrient-filled recipes from quick dinner recipes and make-ahead breakfasts to healthy treats and luscious desserts (with a healthy spin of course).

more about me

Hungry for more?

Please enable JavaScript in your browser to complete this form.
Loading

SEARCH RECIPES

  • Recipe Index
  • Breakfast
  • Mains
  • Snacks
  • Drinks
  • Healthy Treats

Discover

  • Cookbook
  • About Sarah
  • Work with me

follow

The Boring Bits

  • Privacy Policy
  • Terms & Conditions
back to top
Copyright © 2026 Our Nourishing Table.

Design by White With One. Coding by Made to Thrive.

Rate This Recipe

Your vote:


A rating is required
A name is required
An email is required

Recipe Ratings without Comment

Something went wrong. Please try again.